It's mid April, and looking out my window, I see snow. I don't just mean tiny flurries, but a thick, white blanket covering absolutely everything. I'm not sure how deep it is, but it looks like a second Christmas. It's dark, I'm cold, and it doesn't feel like spring to me. A few weeks ago, I decided my home needed a fair amount of bright colours and flowers, so I went into town after church and gathered bright flowers to play with. Back at home, I did a few flower arrangements and placed them around the house, and my mood definitely improved! A few days ago, I wanted to expand this spring feeling to my nails. Easter is a week away, so this design came to mind just in time!

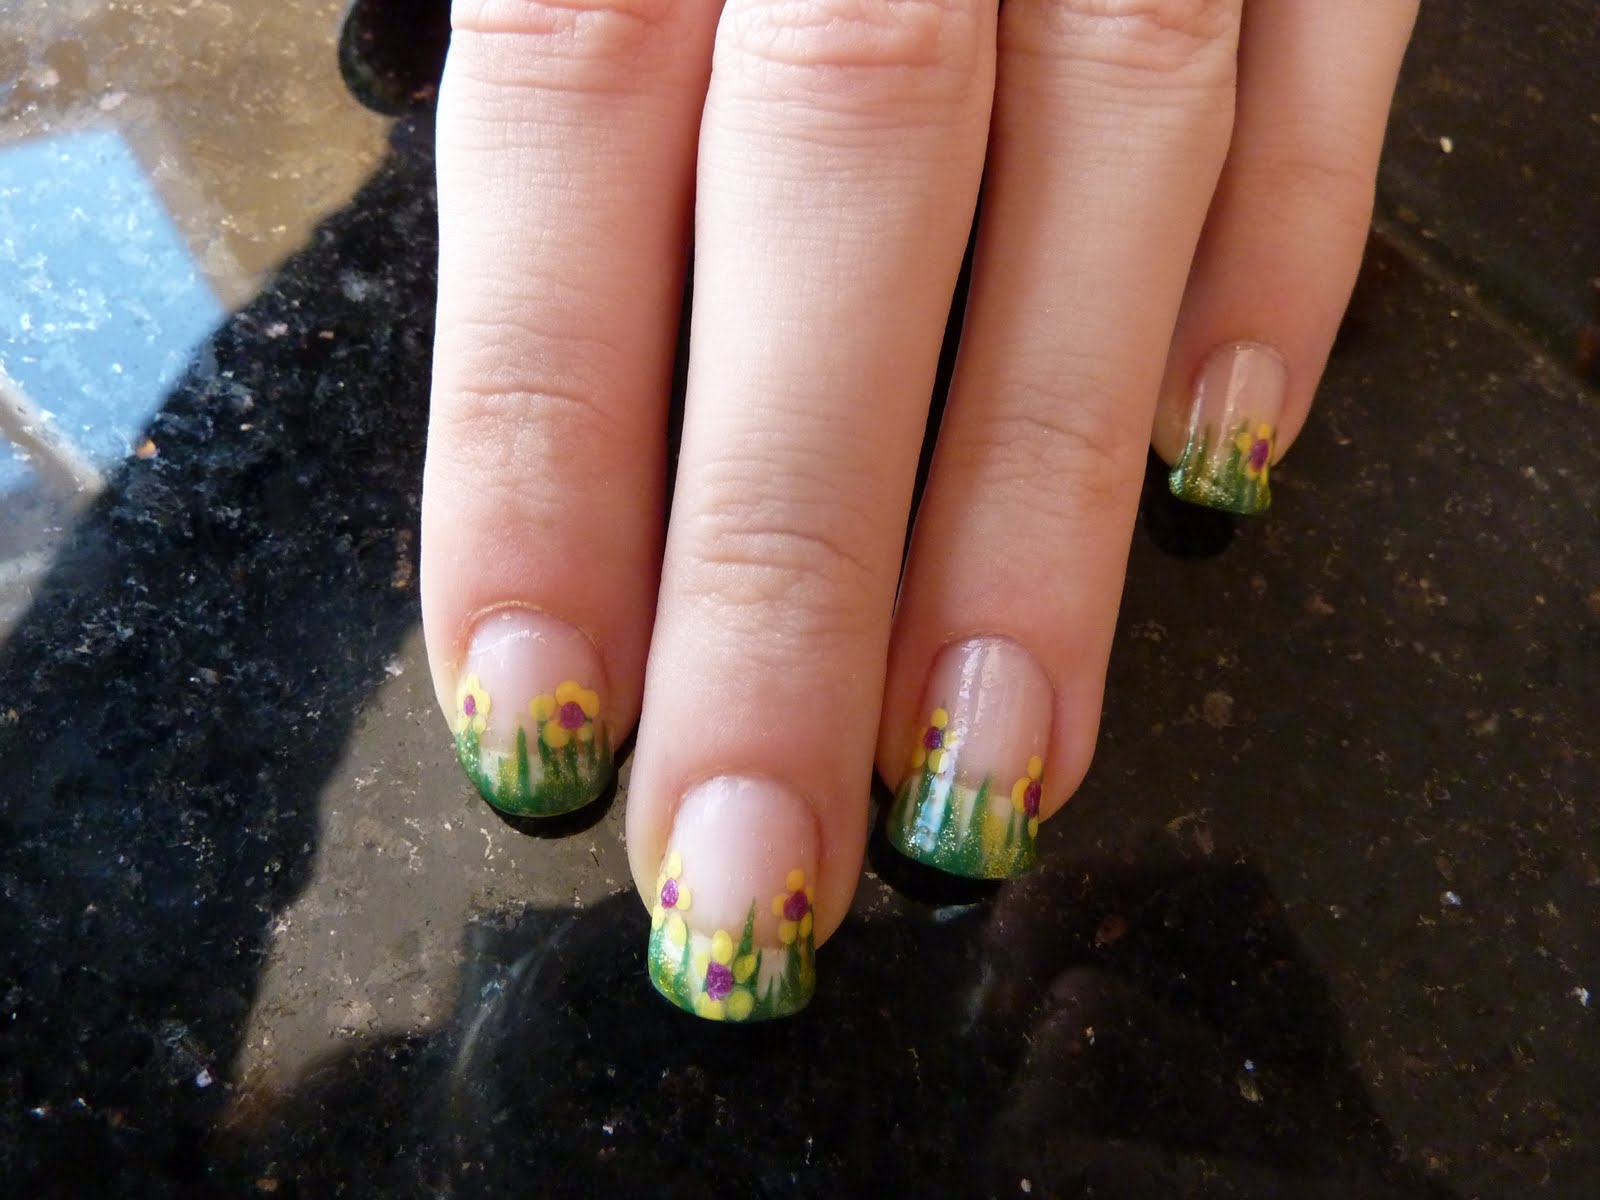
This happens to be my mother's favourite design, and I quite like it too. Because it's just on the tips on my nails, they can grow out and I don't have to keep filling in the design. I quite like how you can see my natural white tips beneath the design, but that's just me. This picture was taken today, and I created this design a few days ago, so you can already see the clear coats growing out from my cuticles. I agree with my mum, I love this design too, and it's looks pretty complex, but it's dead easy. A couple of friends also liked this design, so I copied it onto their nails too. It didn't take me too long, but I really think this design works best for long nails (even though my two friends had shorter nails, they could still carry this design off well).

To start, I applied a base coat, then picked up Rio's "thin brush and pen in green. With the brush, I put a few strokes on the tip of my nails in varying lengths. I did this because even after mowing your lawn, and especially in wild grass, the blades are all different lengths. Then getting a thin brush, I lightly went onto of those green strokes with Migi Nail Art's metallic light green. This next step you can do with any colour, but I chose yellow. I dipped the thicker end of my dotting tool into Sally Hansen's "Mellow Yellow" from her Xtreme wear Hard as Nails line. These flowers have 5 petals each. In the middle of each, I placed a spot of Rio's metallic pink/purple. Fo this you can use your dotting tool, pen, or what I did was I used the tip of the thin brush. Once that's dried, apply a top coat (don't forget the free edge) and you're done!

Apologies on my photography and silly laptop. Just to add a little more sense of the whole Easter feel (by the way, happy Palm Sunday), I added a bunny to my thumb. I did take another picture of it, but for some reason, I can't get it onto my laptop. This bunny is more complicated than the grass and flowers, but if you're up for a challenge, you can add this optional bunny. To start, I drew a while triangle with Art Deco's white, making sure the triangle was round and the pointed end facing down. This is the rabbit's head. I then dragged one stripe up towards my cuticle for an ear, then another one half the length. I then brought this line back down to give the illusion of a floppy ear. Under the rabbit's "head", I added two lage circles. Make sure they are beside each other, but not touching each other nor the head. These will be paws. Taking the same pink colour that I used for the centre of the flowers, I added a large circle in the centre of the triangle for a nose, then followed the two white lines of the ears. To make the floppy ear more realistic, only follow this line half way up. Taking the black in Art Deco, place two tiny dots for eyes above the nose, create a W shape below the nose for a mouth, then and 3 tiny lines on either side of the nose for whiskers. Finally, place 3 vertical lines on the base of the paws. Seal your bunny with a top coat once it dries.

Lost yet? This is a picture of my bunny, but the quality of this picture sucks.. a lot! It looks like the nose is off centre and the eyes are wonky. In the original design, this is not the case. Hopefully you can see that in one of the others pictures. Enough defending myself... if you took the challenge for this bunny, well done! I hope to post a video tutorial of this some time, so if my explanation was too complicated for you, be patient and wait for my video. If you're brave, you could simply wing it! Good luck!


No comments:
Post a Comment
Thank you for viewing my blog! I will read every comment and answer as many questions as I can, either with my own comment, or in the next blog post.